The ever-increasing application of big data technology brings with it the need to secure access to the data in your Hadoop cluster. Security in earlier Hadoop days only offered protection against accidental misuse as not even user credentials were properly enforced. Before Hadoop could be a true multi-user platform, where organizations can put all of their data and host many different applications, the security issue obviously had to be tackled. The Hadoop community addressed this problem by adopting the venerable Kerberos protocol. Kerberos – which dates back to 1993 – is an authentication protocol for distributed applications and support for it is also integrated into KNIME Big Data Extensions.
Using Kerberos is often a bit of a hassle. But don’t despair, in this blog post we will show you step-by-step how to properly configure a Windows client with KNIME Big Data Connectors, so that you can connect to Hive, Impala, and HDFS in a Kerberos-secured cluster.
By the way, KNIME Extension for Apache Spark also supports Kerberos. Detailed configuration steps can be found in the Installation Guide PDF on the product page.
If any of the Kerberos terminology is unclear, you can refer to the glossary at the bottom of this blog post.
Connecting to a Kerberos-secured cluster consists of the following three high-level steps:
- Configure the Kerberos client.
- Log into Kerberos (i.e. obtain a Kerberos ticket).
- Configure KNIME Big Data Connectors.
Step 1: Configure the Kerberos client
In this step we will configure the Kerberos client and KNIME Analytics Platform, so that you can log into Kerberos.
First, you need to obtain or create a valid Kerberos client configuration file. If your user is in the same Kerberos realm as the Hadoop cluster, then you can download the /etc/krb5.conf file directly from a cluster node, e.g. using WinSCP or pscp from PuTTY. Alternatively, you can write a krb5.conf file yourself. A minimal configuration file could look like this:
The above example declares that you are in a Kerberos realm called “MYCOMPANY.COM” and that the hostname of the Kerberos KDC is “kdc.mycompany.com”. Adjust these values as appropriate for your setup. If you do not know what to put in here, or if your user is in a different Kerberos realm than the cluster, please ask your Hadoop cluster administrator for the correct values.
Now, put the krb5.conf file into a location of your choice, where it can be accessed by Analytics Platform. It is recommended to store the file outside of the Analytics Platform installation folder, to avoid accidentally deleting it during upgrades. Then append the following line to the knime.ini file inside the Analytics Platform installation folder:
Replace <PATH> with the full path to your krb5.conf file, for example C:\krb5.conf.
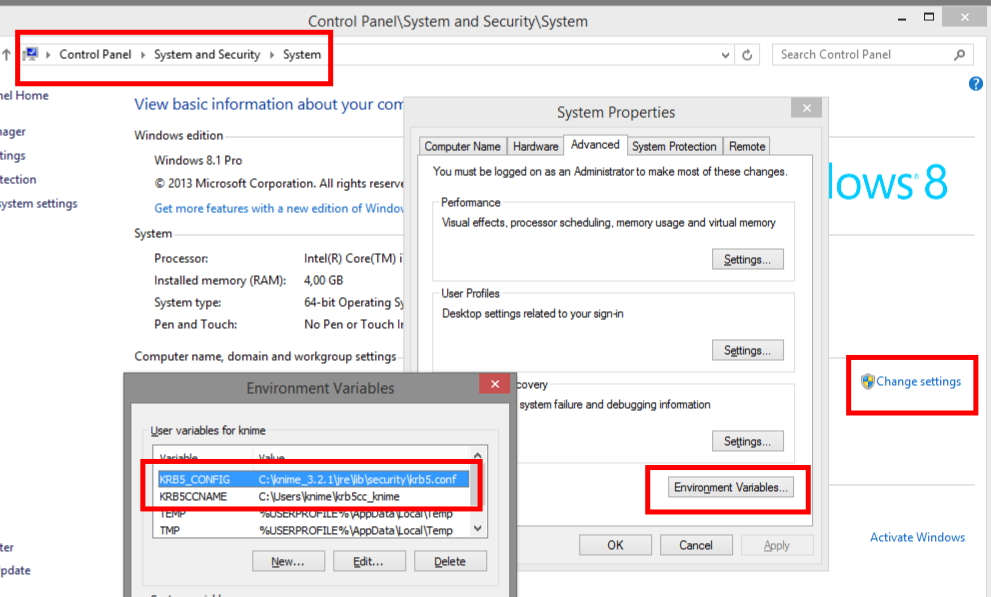
Next, we need to tell your Kerberos client where to find krb5.conf. You need to set two environment variables:
- KRB5_CONFIG This must be the full path to your krb5.conf (see screenshot for example). It needs to be the jre\lib\security\krb5.conf inside the Analytics Platform installation folder. Both KNIME Analytics Platform and your Kerberos client will read this file in order to connect to Kerberos.
- KRB5CCNAME This must be a file called “krb5cc_username” inside your Windows user home directory. Remember to replace “username” with the actual name of your Windows user (see screenshot for example). This file serves as a ticket cache, in which your Kerberos client will store a ticket after a successful login and from which KNIME Analytics Platform will read it.
On Windows you can set environment variables in the Control Panel as shown in the screenshot. Adjust the environment variables as appropriate for your setup.
(click on the image to see it in full size)
Step 2: Log into Kerberos
Now, we will download a Kerberos client and perform the actual Kerberos login.
I recommend using the MIT Kerberos for Windows (kfw) client, that can be downloaded here:
- For 64-bit Windows: http://web.mit.edu/kerberos/dist/kfw/4.0/kfw-4.0.1-amd64.msi
- For 32-bit Windows: http://web.mit.edu/kerberos/dist/kfw/4.0/kfw-4.0.1-i386.msi
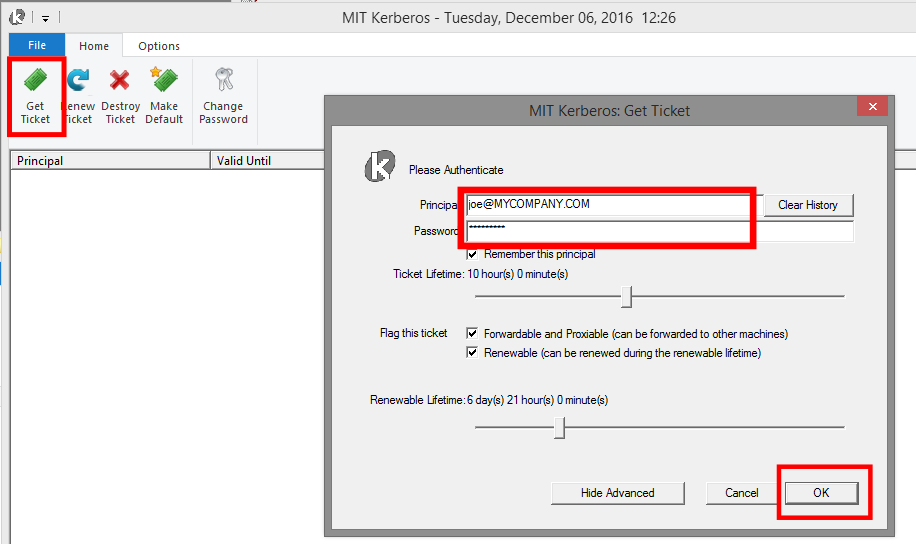
Run the installer and open the MIT Kerberos Ticket Manager. Click “Get Ticket”, enter your user principal and confirm with “OK”. If you do not know your Kerberos user principal or password, you need to obtain this information from your cluster administrator.
(click on the image to see it in full size)
Step 3: Configure KNIME Big Data Connectors
In the last step, we will finally connect to Hive, Impala and HDFS from KNIME Analytics Platform.
Note for Cloudera users: Cloudera provides proprietary database drivers for Hive and Impala. We recommend you use these instead of the built-in drivers. Please download them from the Cloudera website:
- Hive drivers: http://www.cloudera.com/downloads/connectors/hive/jdbc.html
- Impala drivers: http://www.cloudera.com/downloads/connectors/impala/jdbc.html
For Hive this will give you a file called hive_jdbc_<version>zip. Inside this ZIP file is another ZIP file: Cloudera_HiveJDBC41_<version>.zip. It contains a folder with the driver files. Add this folder in KNIME under File > Preferences > KNIME > Databases (via Directory). After this, you need to restart KNIME Analytics Platform.
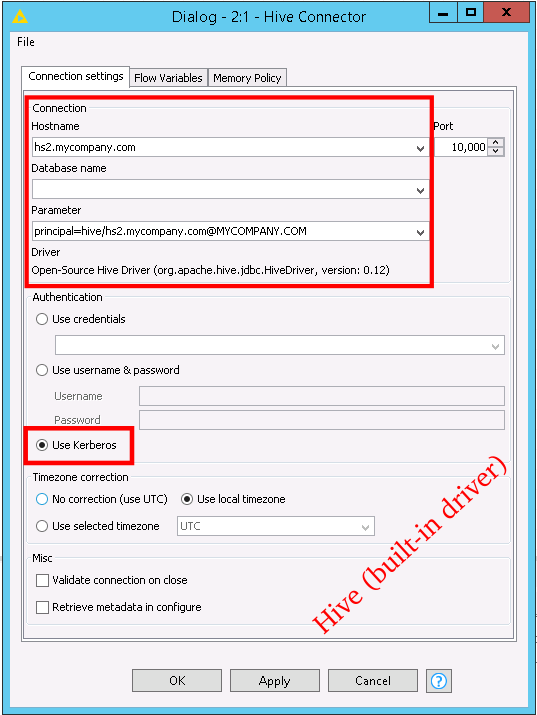
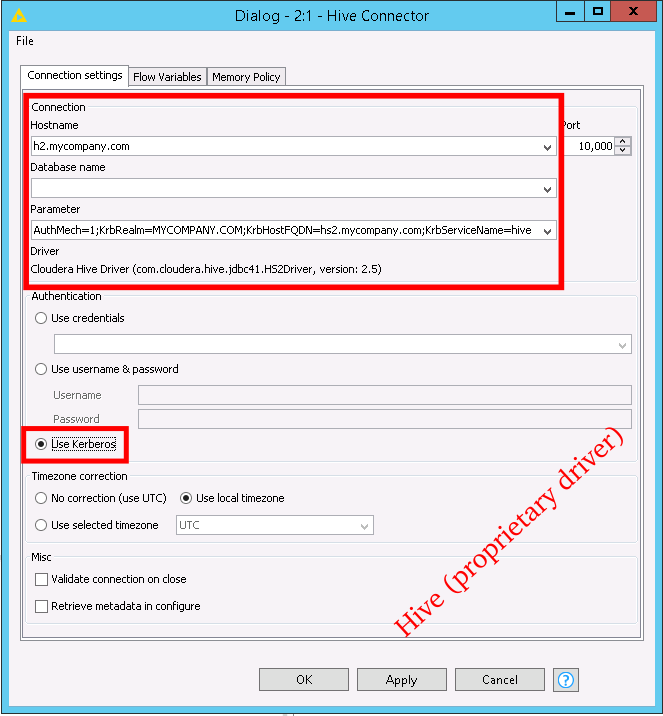
Connecting to Hive
Add the “Hive Connector” node to a KNIME workflow and open the configuration dialog. Now, you need to know the service principal of the Hive Server 2 service, to which the JDBC driver makes a network connection. Usually, this principal has the form
where “hive” is the name of the service, and “hs2.mycompany.com” is the hostname of the machine on which it runs. If you do not know how to set this, please ask your cluster administrator.
The following fields need to be filled out in the Hive Connector configuration dialog:
- Hostname field: Specify the fully-qualified domain name of your Hive Server 2 host. Example: hs2.mycompany.com
- Parameter field:
- When using the built-in driver: Set the “principal” property to your Hiveserver2 service principal. Example: “principal=hive/hs2.mycompany.com@MYCOMPANY.COM”
- When using the Cloudera proprietary driver: There are several properties that need to be specified: AuthMech, KrbRealm, KrbHostFQDN, KrbServiceName. AuthMech needs to be “1”. The last three parameters make up the Hive Server 2 service principal. Example: “AuthMech=1;KrbRealm=MYCOMPANY.COM;KrbHostFQDN=hs2.mycompany.com;KrbServiceName=hive”
- Authentication Field: Choose “Use Kerberos”
Screenshots with Hive configuration examples are shown below.
Connecting to Impala
The steps are the same as those for Hive, with the exception that service principals for Impala follow the form
where “impala” is the service name, and “node.mycompany.com” is the Impala node in your cluster that you want to connect to. Adjust the Hostname and Parameter fields accordingly.
Connecting to HDFS
Open the HDFS Connection node configuration dialog. All that needs to be done here is to enter the hostname of an HDFS NameNode and then select Kerberos as the authentication scheme, as shown in the screenshot below.

Conclusion
I hope that this article has helped you speak Kerberos more fluently, when in conversation with KNIME Big Data Extensions! If you found this article helpful, please share it generously, otherwise let us know of any questions or problems you have had when using our Big Data Extensions with a Kerberos-secured cluster.
Glossary
- KDC Key Distribution Center, a server that handles Kerberos authentication.
- Principal The Kerberos-equivalent to a username. In Kerberos, principals identify users or services. Examples:
- A user principal: joe@MYCOMPANY.COM
- A service principal (in this case for Hive Server 2): hive/server.mycompany.com@MYCOMPANY.COM
- Realm Indicates an administrative domain. Both users and services are registered as principals with their passwords in a realm. Example: MYCOMPANY.COM
- Ticket A piece of data that serves as proof that you have authenticated yourself as a principal.
- Ticket cache: Holds your Kerberos tickets. In order to work with KNIME Analytics Platform, tickets need to be stored in a file-based ticket cache, as specified by the KRB5CCNAME environment variable.
Troubleshooting
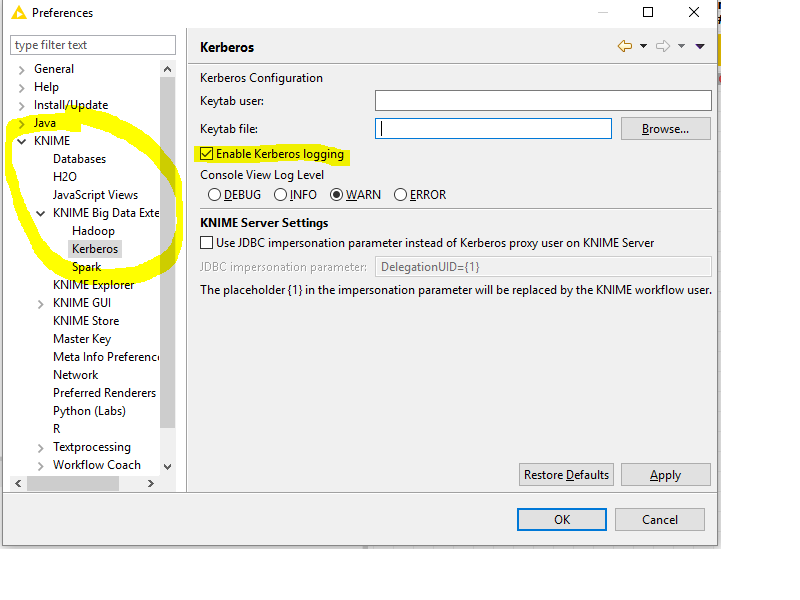
If you encounter problems with the Kerberos setup it is helpful to enable Kerberos logging to get more information for the problem. To enable Kerberos logging open KNIME Analytics Platform and go to File > Preferences. In the Preferences dialog go to KNIME > KNIME Big Data Extensions > Kerberos and check the Enable Kerberos logging option as shown in the screenshot below. After a restart of KNIME Analytics Platform, additional Kerberos information will be displayed in the KNIME console and KNIME log file. To save the KNIME log file go to View > Open KNIME log. Once the log file is open go to File > Save As... and define where you want to store the log file.